Thursday, May 24, 2018

Post # 14 - Streetside and Curbside framework

I've spent the past two weeks or so pulling staples, nails and screws out of the framework for the streetside and curbsides.  I've also removed the most rotten wood and replaced it with new, and reinforced where the wood was questionable in a few spots. My foam cutter came from Amazon so I insulated the streetside - when I can find the time I will do the same thing for the curbside framework. (Camping season has arrived).  The outside curved edges were replaced with 1/4" X 1.5" strips, glued and stapled to make it 1.5" thick (or as close to it as I could get it).  I'm glad I had lots of clamps, but still think I could have used a few more of the screw to tighten type (see the last photo). Lots of photos of the black rot in the perimeter framework.


In the background of this photo
is the interior of the streetside framework, already cleaned up, repaired, & insulated, with wires for the lights run through the insulation and framework. 


Clamping the new curbing over the curve in the front.  Did the same thing for the back end.


Monday, May 14, 2018

Post #13 Gluing and Stapling Floor Frame

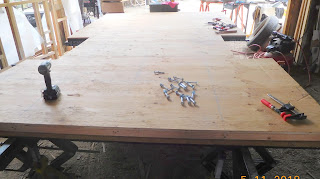
We spent a few days cutting down the 3 sheets of plywood to match the floor framework and positioning it into place.  Then I propped it up and glued and stapled it down. I also added a few 2 1/2 inch screws to a few spots for added strength.  Once that was done we made sure the whole thing was in place on the frame and used T-Nuts and bolts to attach it to the metal frame around the edges, and added a row down the middle.  It should never fall off the frame.


I also did a little wiring to the junction box, The breaks, and breakaway switch, and 7 pin connector are ready to be used.  All I have to do is add the trailer wiring when it's ready to go. 


Saturday, May 5, 2018

Post #12 - Wheel wells & battery box

Thursday May 3rd, I cleaned up the wheel wells, straightened the edges and flattened the nail holes.  I plan on spraying undercoating on the inside to help protect them from rocks and other debris.  I've ordered new wheels from Vintage Trailer Supply and they should be here next week.

I also cleaned up the edges of all the windows a little - most of the butyl tape residue is gone... I do need to replace 3-4 cracked window panes when I get back to working on them. 

Joe spent the day creating a new battery box for the front of the trailer. cutting and welding it together.  It's going to look sharp and protect the battery, junction box, and breakaway switch battery & box. 

I'll post photos when they are all done.
Here are a few photos of the battery box Joe made for the trailer this past weekend, after paint.

Wednesday, May 2, 2018

Post # 11 - Bearings and floor insulation

These past few days have been spent re-greasing the bearings, replacing what needed to be replaced (seals, bearings, z rings), fixing what needed to be fixed and reinstalling into the hubs. Glad I have a multi talented husband that is willing to do that for me.

I ordered a styrofoam cutter from Amazon and it came today, so I cut all the 1.5" foam for the floor insulation and got it installed.  Worked out wonderfully - wished I'd gotten the cutter years ago... I just can't seem to get a knife to cut smoothly and I always leave little pebbles of styrofoam everywhere when I use one.  Melting it is way less messy - I love it.

I also spent a little time pulling the old butyl tape from my window edges, and checked over my range hood. I've got 3 broken jalousie windows I'll need to replace eventually, and many seals to replace. So much to do - never enough time.

Joe's building my battery box - photos later.  Along with the battery, I plan on putting my breakaway battery box in it as well as my junction box for the trailer wiring.

Post #10 - Subfloor and Frame

Spring has finally come and with it warm weather - it got close to 70 degrees here yesterday. Yay!!

My breakaway switch came this week as well as my junction box for the wiring.  We received the bearings, but the seals were not the right ones - I will have to call etrailer and see if they have items not on their website.

Last week I spray painted the underside and edges of the "belly pan" (5/8" plywood) with 2 coats of undercoating using about 9 cans. Then I flipped it over and covered the seams with 5" of aluminum flashing to tie them together, and covered it with 6" self-adhered flashing. It shouldn't leak

Once that was done I layed out the framework for the floor that I'd cut and marked a few weeks ago.  It got glued, stapled, nailed and screwed together - nice and strong.  Some would probably say I did too much, but more is sometimes better in my opinion.   Next week I'll be tackling the insulation between the studs, and putting on the plywood for the floor.  I'll be using this as a platform to work on the cabinets and framework for the sides.